
Micro frontend is an architectural pattern that involves breaking a monolithic frontend application into smaller, independently deployable micro frontend components.
Micro frontends are a front-end implementation of microservices for complex web apps.
This can help you to improve scalability, maintainability, and team collaboration in large-scale
React applications.
Why Micro Frontend?
- Modern web apps are becoming increasingly complex and most of the code lives on the client-side.
- With this Micro frontend approach, we can make it easier to understand, develop, test, and deploy larger applications.
- There are so many advantages to using this approach. At the same time, don’t use it for every app, especially small apps.
- Each app can be developed independently, each app can use a different stack, each can be owned by a single team or multiple teams and finally, they don’t share logic.
- It’s tempting to use a different framework for each app but not recommended. Remember, this approach should make your life easier.
- We can split the apps by domain, feature, page, and section.
- There are two popular frameworks which implement this architecture: single-spa and frint.js.
Pros and Cons of Micro Frontend:
Pros:
- Scalability: Dividing a monolithic frontend into smaller components makes it easier to scale specific parts of the application as needed.
- Maintainability: Simplified with each micro frontend deployed and tested independently.
- Team Collaboration: Enhanced by allowing teams to work independently.
- Improved UX: Enhance the overall speed and user experience by segmenting the program into smaller, manageable chunks.
- Modular: Design, test, and deploy micro frontends as distinct modules for easier reuse and new functionality.
Micro frontends improve collaboration for better user experience in large frontend applications.
Cons:
- Increased complexity: Breaking down front-end into smaller components leads to more complexity.
- Higher coordination overhead: Teams need more coordination and communication.
- Increased development and deployment time: Takes longer to develop, test, and deploy.
- Potential for compatibility issues: Different technology stacks may cause compatibility issues.
Micro Frontends security concerns: Increase attack surface, XSS/CSRF risk, secure APIs/events, maintain code quality, lack of standardization, adequate testing, legacy code security.
Monolithic Vs Micro Frontend:
| Monolithic | Micro Frontend |
|---|---|
| – Single codebase for all components | – Decentralized codebase for components |
| – All components share the same technology stack | – Components can have different technology stacks |
| – Single deployment pipeline for the entire application | – Independent deployment pipelines for each component |
| – Single team responsible for the entire application | – Multiple teams responsible for different components |
| – Limited separation of concerns | – Improved separation of concerns |
| – Longer development cycles | – Shorter development cycles for individual components |
| – Potentially easier to maintain | – Potentially more complex to maintain |
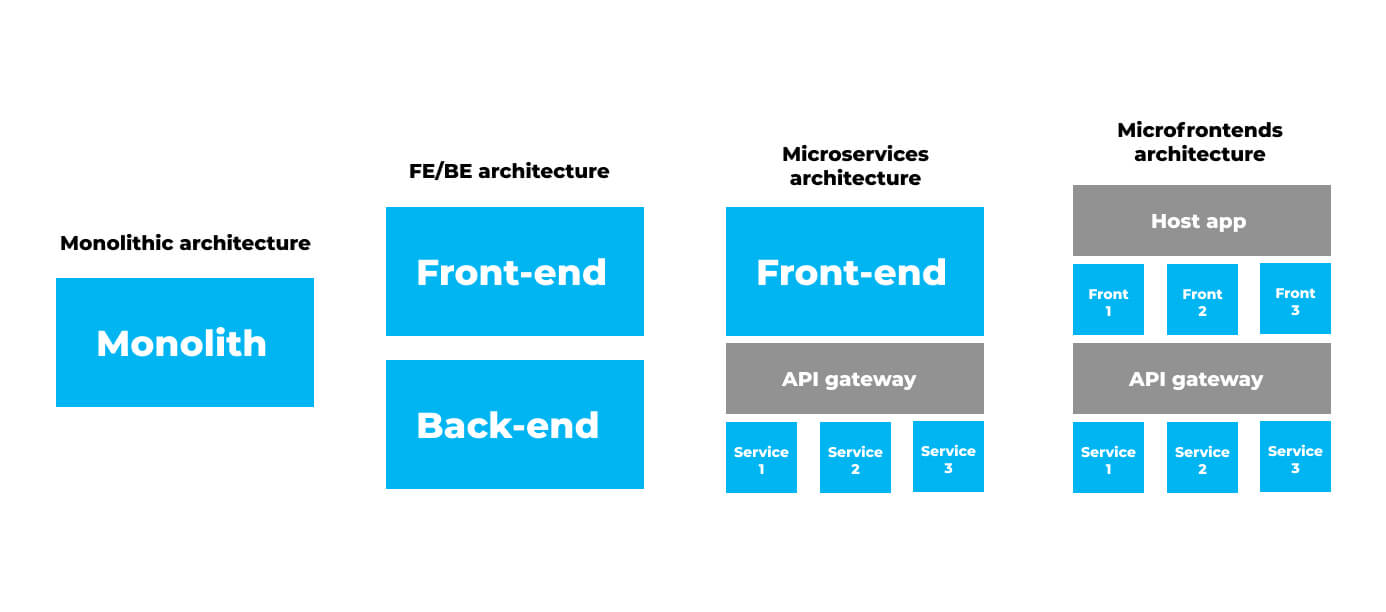
Different Approaches to Micro Frontends:
- Webpack Module Federation: Reusable micro-frontends with easy communication and efficient management, but needing Webpack setup.
- Iframes: Separates micro-frontends and parent app, isolates failures and security issues, but introduces performance overhead and communication challenges.
- Web Components: Seamless integration, better performance than iframes, but requires web component standards support.
- React Component Libraries: High flexibility and reusability, but introduces versioning and compatibility challenges.
- Monorepos: Centralized code management, useful for large projects and centralized development.
- Customized Orchestrator: Manages complex inter-micro-frontend dependencies, suitable for unique micro-frontend requirements.
- NGINX Reverse Proxy: Routes requests to appropriate micro-frontend, useful for cross-domain and network level management.
Example Micro-frontend Project With React:
Here’s a step-by-step guide to implement micro-frontends using single-spa and react.js:
1. Setting up the Parent Application:
Create a single-spa React application by running npx create-single-spa command
$ create-single-spa
? Directory for new project single-spa-root-config
? Select type to generate single-spa root config
? Which package manager do you want to use? npm
? Will this project use Typescript? No
? Would you like to use single-spa Layout Engine (currently in beta)? No
? Organization name (use lowercase and dashes) nobietech
Great! Now, if you check out the single-spa-root-config directory, you should see a skeleton root config app. We’ll customize this in a bit, but first let’s also use the CLI tool to create our other three micro-frontend apps.
2. Setting up the Micro-Frontend Apps:
To generate our first micro-frontend app, the header, we’ll follow these steps:
$ create-single-spa
? Directory for new project single-spa-app-header
? Select type to generate single-spa application / parcel
? Which framework do you want to use? react
? Which package manager do you want to use? npm
? Will this project use Typescript? No
? Organization name (use lowercase and dashes) nobietech
? Project name (use lowercase and dashes) single-spa-app-header
Follow below CLI prompts:
- Select “single-spa application / parcel”
- Select “react”
- Select “yarn” or “npm” (I chose “yarn”)
- Enter an organization name, the same one you used when creating the root config app (“nobietech” in my case)
- Enter a project name (I used “single-spa-app-header”)
After successfully creating the header app, we can repeat the same steps to create the other two apps. However, we need to replace the name “single-spa-app-header” with “single-spa-app-app1” the first time and “single-spa-app-app2” the second time.
In this way, we can generate all four required apps, which include one parent app and three micro-frontend apps. With these apps created, we can now proceed to the next step, which is to connect all of them together.
3. Registering the Micro-Frontend Apps with the Parent App:
As stated before, one of the container app’s primary responsibilities is to coordinate when each app is “active” or not. In other words, it handles when each app should be shown or hidden.
To help the container app understand when each app should be shown, we provide it with what are called “activity functions.” Each app has an activity function that simply returns a boolean, true or false, for whether or not the app is currently active.
Inside the single-spa-root-config directory, in the activity-functions.js file, we’ll write the following activity functions for our three micro-frontend apps.
export function prefix(location, ...prefixes) {
	return prefixes.some(
		(prefix) => location.href.indexOf(`${location.origin}/${prefix}`) !== -1
	);
}

export function header() {
	// The header is always active
	return true;
}

export function app1(location) {
	return prefix(location, 'app1');
}

export function app2(location) {
	return prefix(location, 'app2');
}
To integrate our micro-frontend apps with single-spa, we need to register each app using the “registerApplication” function. This function requires at least three arguments: the app name, a loading function, and an activity function that determines when the app is active.
We can add the following code to the “root-config.js” file located in the “single-spa-root-config” directory to register our micro-frontend apps.
import { registerApplication, start } from 'single-spa';
import * as isActive from './activity-functions';

registerApplication(
	'@nobietech/single-spa-app-header',
	() => System.import('@nobietech/single-spa-app-header'),
	isActive.header,
);

registerApplication(
	'@nobietech/single-spa-app-app1',
	() => System.import('@nobietech/single-spa-app-app1'),
	isActive.app1,
);

registerApplication(
	'@nobietech/single-spa-app-app2',
	() => System.import('@nobietech/single-spa-app-app2'),
	isActive.app2,
);

start();
Now that we’ve set up the activity functions and registered our apps, the last step before we can get this running locally is to update the local import map inside the index.ejs file in the same directory.
We’ll add the following code inside the head tag to specify where each app can be found when running locally:
 <% if (isLocal) { %>
    <script type="systemjs-importmap">
    {
      "imports": {
        "react": "https://unpkg.com/react@18/umd/react.production.min.js",
        "react-dom": "https://unpkg.com/react-dom@18/umd/react-dom.production.min.js",
        "@nobietech/root-config": "http://localhost:9000/nobietech-root-config.js",
        "@nobietech/single-spa-app-header": "http://localhost:9001/nobietech-single-spa-app-header.js",
        "@nobietech/single-spa-app-app1": "http://localhost:9002/nobietech-single-spa-app-app1.js",
        "@nobietech/single-spa-app-app2": "http://localhost:9003/nobietech-single-spa-app-app2.js"
      }
    }
  </script>
    <% } %>
Each app contains its own startup script, which means that each app will be running locally on its own development server during local development.
As you can see, our header app is on port 9001, our app 1 app is on port 9002, and our app 2 app is on port 9003.
With those three steps taken care of, let’s try out our app.
4. Test Run for Running Locally:
To get our app running locally, we can follow these steps:
- Open four terminal tabs, one for each app
- For the root config, in the
single-spa-root-configdirectory:yarn start(runs on port 9000 by default) - For the header app, in the
single-spa-app-headerdirectory:yarn start --port 9001 - For the app 1 app, in the
single-spa-app-app1directory:yarn start --port 9002 - For the app 2 app, in the
single-spa-app-app2directory:yarn start --port 9003
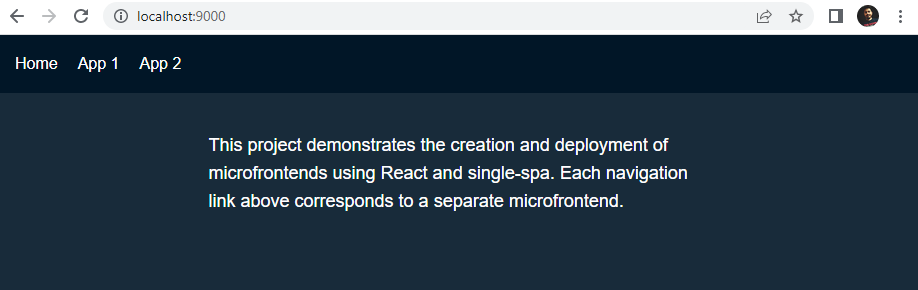
Now, we’ll navigate in the browser to http://localhost:9000 to view our app.
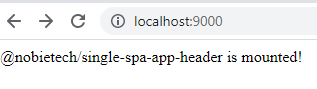
On our main page, the header is showing because the header app is always active.
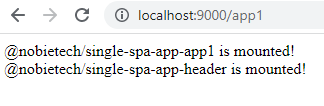
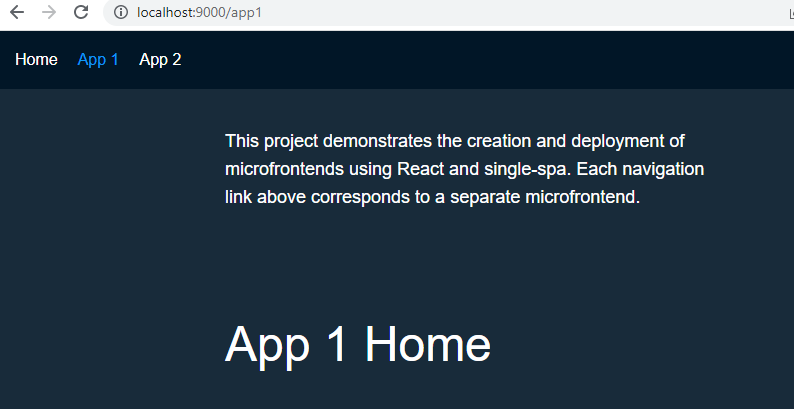
Now, let’s navigate to http://localhost:9000/app1. As shown in our activity functions above, we’ve specified that the app 1 should be active (shown) when the URL path begins with “app1.” So, this activates the app 1, and we should see the text for both the header and the app 1 now.
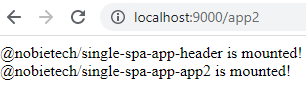
One more time, let’s now navigate to http://localhost:9000/app2. As expected, this activates the app 2, so we should see the text for the header and the app 2 now.
Fine-tuning the apps with minor adjustments:
Let’s make some minor improvements to our apps so they look and behave a little nicer.
The apps may load out of order if you refresh the page because no mount container has been specified for each app. We can solve this issue by registering the apps with a mount container specified in the index.ejs file.
//Add this under header tag in index.ejs file...
<div id="header-container">
<div class='mainContent'>
<p>
    This project demonstrates the creation and deployment of micro frontends using React
    and single-spa. Each navigation link above corresponds to a separate micro frontend.
</p>
</div>
</div>
<main>
  <div id="app1-container"></div>
  <div id="app2-container"></div>
</main>
In the root-config.js file, we can provide a fourth argument to each function call when registering the apps, which specifies the DOM element for mounting each app.
import { registerApplication, start } from 'single-spa';
import * as isActive from './activity-functions';

registerApplication(
	'@nobietech/single-spa-app-header',
	() => System.import('@nobietech/single-spa-app-header'),
	isActive.header,
	{ domElement: document.getElementById('header-container') } //4th argument
);

registerApplication(
	'@nobietech/single-spa-app-app1',
	() => System.import('@nobietech/single-spa-app-app1'),
	isActive.app1,
	{ domElement: document.getElementById('app1-container') }  //4th argument
);

registerApplication(
	'@nobietech/single-spa-app-app2',
	() => System.import('@nobietech/single-spa-app-app2'),
	isActive.app2,
	{ domElement: document.getElementById('app2-container') }  //4th argument
);

start();
That’s great! Now the apps will consistently mount to a designated location.
Styling the App:
To enhance the appearance of the app, we can add basic styles to the index.ejs file located in the single-spa-root-config directory. This can be accomplished by adding CSS code at the end of the head tag.
<style>
  body, html { margin: 0; padding: 0; font-size: 16px; font-family: Arial, Helvetica, sans-serif; height: 100%; }
  body { display: flex; flex-direction: column; }
  * { box-sizing: border-box; }
 .mainContent {color: white; padding: 20px; font-size: 18px; line-height: 28px; display: flex; justify-content: center; }
  p { width: 500px; }
</style>
Next, we can style our header app by finding the single-spa-app-header directory, creating a root.component.css file, and adding the following CSS:
.nav {
  display: flex;
  flex-direction: row;
  padding: 20px;
  background: #011627;
  color: #fff;
}

.link {
  margin-right: 20px;
  color: #fff;
  text-decoration: none;
}

.link:hover,
.link:focus {
  color: #1098f7;
}
To apply the styles to the HTML, we can import the CSS file into the root.component.js file located in the same directory and utilize the classes and styles. Additionally, we can modify the header nav content to include two links to facilitate navigation within the app.
import { BrowserRouter, Link } from 'react-router-dom';
import './root.component.css';

export default function Root() {
	return (
		<BrowserRouter>
			<nav className="nav">
				<Link to="/" className="link">
					Home
				</Link>
				<Link to="/app1" className="link">
					App 1
				</Link>
				<Link to="/app2" className="link">
					App 2
				</Link>
			</nav>
		</BrowserRouter>
	);
}
For the app 1 and app 2 apps, we can repeat the process by creating a root.component.css file in each app’s project directory and updating their respective root.component.js files.
For the app 1 app, the modifications will include:
.container1 {
  background: #1098f7;
  color: white;
  padding: 20px;
  display: flex;
  align-items: center;
  justify-content: center;
  flex: 1;
  font-size: 3rem;
}
import './root.component.css';
export default function Root() {
return (
<div className="container1">
<p>App 1 Home</p>
</div>
);
}Apply the styles and update the content for the app 2 app.
Great! The changes made to the app have improved both its appearance and functionality.
Note: This is a basic implementation example, you can add more complex functionality and customization to fit your specific use case.
Conclusion:
💻 Micro Frontends: modern approach for complex web apps.
💡 Benefits: improved scalability, better UX, enhanced maintainability, and faster development.
🤔 Implementation may be challenging, but with proper tools and processes, organizations can reap the full benefits.
🔥 A promising architecture, successfully adopted across industries.
💻 Manages complex frontend code, delivering better quality and user-friendly web applications.
🚀 Micro Frontends is the way forward for modern web development! 🚀
I recommend checking out the following resources:
[1] https://micro-frontends.org/
[2] https://martinfowler.com/articles/micro-frontends.html
[3] https://blog.bitsrc.io/why-micro-frontends-are-the-future-of-web-development-6e26ad33b971
Have any questions or suggestions? Please leave a comment.
Thank you for reading 😊


As I website possessor I conceive the subject matter here is real great, regards for your efforts.
Appreciate it for all your efforts that you have put in this. very interesting info .
Real nice pattern and wonderful content material, absolutely nothing else we want : D.
That is the best weblog for anyone who desires to search out out about this topic. You understand a lot its virtually arduous to argue with you (not that I actually would want…HaHa). You undoubtedly put a brand new spin on a subject thats been written about for years. Nice stuff, simply great!
Thank you for sharing excellent informations. Your web site is very cool. I’m impressed by the details that you have on this website. It reveals how nicely you understand this subject. Bookmarked this website page, will come back for more articles. You, my friend, ROCK! I found just the info I already searched everywhere and just could not come across. What a great web-site.
Nice post. I learn something more challenging on different blogs everyday. It will always be stimulating to read content from other writers and practice a little something from their store. I’d prefer to use some with the content on my blog whether you don’t mind. Natually I’ll give you a link on your web blog. Thanks for sharing.
Hey very nice site!! Man .. Beautiful .. Amazing .. I will bookmark your blog and take the feeds also…I’m happy to find numerous useful info here in the post, we need work out more techniques in this regard, thanks for sharing. . . . . .
I like this site very much, Its a very nice spot to read and incur information. “Anyone can stop a man’s life, but no one his death a thousand doors open on to it. – Phoenissae” by Lucius Annaeus Seneca.